Create Stunning 3D Models Without Breaking the Bank
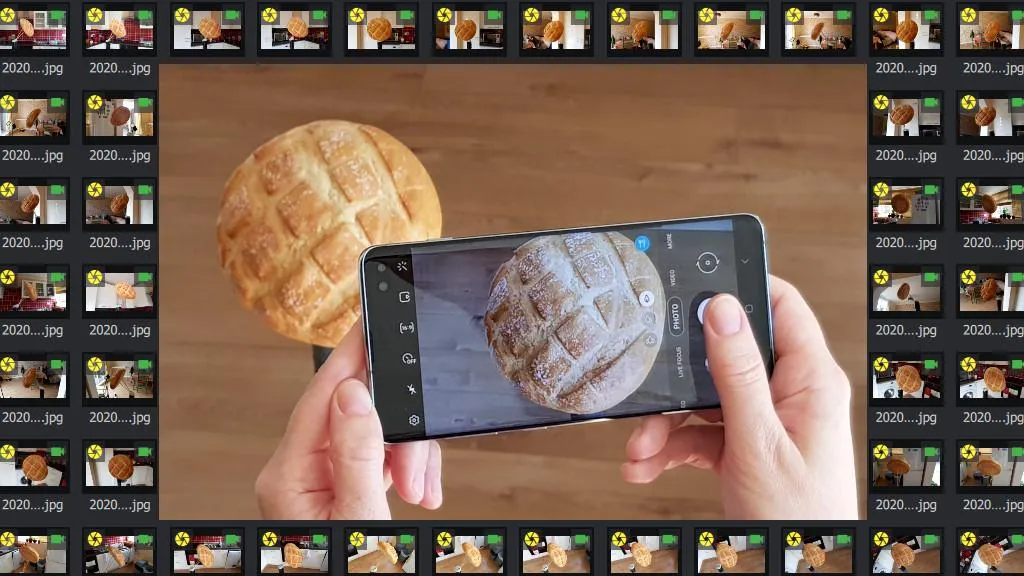
Did you know that you can create museum-quality 3D models with equipment you likely already own? While industrial 3D scanning systems can cost tens of thousands of dollars, photogrammetry—the art of creating 3D models from photographs—has democratized 3D capture technology, putting professional-level results within reach of virtually anyone with a camera and computer.
If you’ve been hesitant to explore 3D modeling because of perceived high costs or technical barriers, you’re missing out on an accessible technology that can transform your projects, whether you’re a hobbyist, student, professional designer, or small business owner.
Our digital modeling specialists have helped hundreds of clients implement cost-effective photogrammetry workflows, and today we’re sharing the proven techniques that deliver exceptional results without the premium price tag.
Understanding Photogrammetry: The Science of Photos Becoming 3D
Before diving into specific techniques, let’s establish a clear understanding of how photogrammetry actually works.
The Basic Principles Behind Photogrammetry
At its core, photogrammetry reconstructs 3D objects from 2D photographs through a process of:
- Capturing multiple overlapping photographs of an object or scene from different angles
- Identifying common points that appear in multiple images
- Triangulating positions in 3D space based on how these points appear from different perspectives
- Creating a point cloud representing the object’s geometry
- Generating a textured 3D mesh from this spatial data
This approach leverages the same principles our brains use to perceive depth from two slightly different perspectives (our eyes)—but with dozens or hundreds of viewpoints for greater accuracy.
The Smithsonian Institution notes that photogrammetry has become their preferred method for digitizing many museum artifacts due to its combination of visual fidelity, reasonable accuracy, and low equipment costs.
Why Photogrammetry Excels for Budget-Conscious Users
Several factors make photogrammetry particularly suitable for those with limited budgets:
- Minimal equipment requirements: Uses cameras you may already own
- Scalable investment: Start simple and upgrade components as needed
- Diverse applications: Works for objects of almost any size, from miniatures to buildings
- Visual quality: Captures both geometry and color/texture information
- Progressive learning curve: Allows skill development without large upfront costs
As confirmed by the IEEE Geoscience and Remote Sensing Society, modern photogrammetry software has dramatically reduced the technical expertise required while simultaneously improving results, making this an ideal entry point for 3D digitization.
Essential Equipment: The Minimum Viable Setup
Let’s examine what equipment you actually need to get started with photogrammetry on a budget.
Camera Options: From Smartphones to DSLRs
Your camera is the most important component of your photogrammetry setup:
- Smartphone camera ($0 additional cost): Modern smartphones (iPhone X or newer, Samsung Galaxy S9 or newer) can produce excellent results for many applications
- Entry-level digital camera ($250-500): Provides better control and image quality
- DSLR or mirrorless camera ($500-1000): Offers optimal results with greatest flexibility
“The best camera is the one you already have,” notes our product design team. “While professional setups use specialized equipment, we’ve created exhibition-quality models using just smartphone cameras when proper technique is applied.”
Key camera features that impact photogrammetry results:
- Resolution: Higher megapixel counts provide more detail (12MP minimum recommended)
- Manual controls: Ability to set consistent exposure, focus, and depth of field
- Lens quality: Sharper lenses produce more accurate measurements
- Low-light performance: Better sensors reduce noise in challenging lighting conditions
Essential Accessories Under $100
A few inexpensive accessories dramatically improve results:
- Tripod ($25-50): Ensures sharp images and consistent positioning
- Remote shutter release ($10-20): Prevents camera movement during exposure
- Diffuse lighting ($30-80): Simple LED panels or ring lights provide even illumination
- Turntable ($20-40): Allows consistent rotation of objects for easier capture
- Gray cards or color charts ($15-25): Enables proper white balance and color correction
“Our testing shows that proper lighting has the single greatest impact on photogrammetry results after camera quality,” explains our scanning specialist. “Even inexpensive LED panels deliver dramatically better results than ambient room lighting.”
Software Options: Free to Affordable
Photogrammetry software has evolved from expensive specialized tools to accessible options for every budget:
- Free options:
- Meshroom: Open-source solution with excellent results for static objects
- COLMAP: Academic research tool with powerful features but steeper learning curve
- WebODM: Browser-based platform ideal for landscape and architectural applications
- Budget commercial options ($50-200):
- RealityCapture: Offers a pay-per-project licensing model starting around $10/project
- Metashape Standard: One-time purchase with regular updates and excellent support
- 3DF Zephyr Lite: User-friendly option with streamlined workflow
- Mobile apps ($0-20):
- Polycam: Powerful iOS/Android app with surprising capabilities
- Qlone: Simplified approach for quick object capture
- SCANN3D: Android option with cloud processing support
Research by the National Institute of Standards and Technology indicates that for many applications, the results from budget software approach those of systems costing 20-50 times more when proper photographic technique is employed.
The Budget-Friendly Photogrammetry Workflow
Follow this optimized workflow to achieve excellent results without expensive equipment.
Preparation: Setting Up for Success
Before taking your first photo:
- Prepare your subject:
- Clean the object of dust or debris
- For shiny items, apply temporary matte coating (chalk spray, developer spray, or cornstarch)
- For uniform objects, add temporary visual features with small stickers or removable markers
- Place on a non-reflective surface with visual texture
- Optimize your environment:
- Create even, diffuse lighting (avoid harsh shadows)
- Control background (simple but textured backgrounds help with alignment)
- Eliminate reflective surfaces in the background
- Ensure ample space to move around your subject
- Configure camera settings:
- Use manual mode for consistent exposure
- Select appropriate aperture for depth of field (typically f/8-f/11)
- Use lowest ISO setting for clean images (typically 100-400)
- Set appropriate shutter speed for sharp images
- Use fixed white balance (not auto)
“Preparation makes the difference between success and failure,” advises our 3D scanning team. “Spending 15 minutes on proper setup saves hours of frustration later.”
Capture Technique: Methodical Photography
The photography phase requires a systematic approach:
- Establish a capture pattern:
- For objects: Three circular passes at low, middle, and high angles
- For environments: Grid pattern with 60-80% overlap between images
- For faces/people: Arc pattern at consistent distance
- Take sufficient photographs:
- Small simple objects: 30-50 photos
- Complex objects: 60-150 photos
- Full environments: 100-500+ photos
- Include close-ups of detailed areas
- Maintain consistency:
- Keep exposure, focus, and depth of field unchanged
- Maintain similar distance from subject
- Ensure adequate overlap between consecutive images (60-80%)
- Employ additional techniques for challenging subjects:
- Use focus stacking for small objects
- Capture bracketed exposures for high-contrast scenes
- For large objects, include reference markers of known dimensions
According to the American Society for Photogrammetry and Remote Sensing, the most common cause of failed photogrammetry projects is insufficient image overlap—aim for at least 70% overlap between consecutive photos for reliable results.
Processing: From Photos to 3D Model
Once your photographs are captured:
- Import and organize:
- Perform basic image corrections (lens correction, white balance)
- Remove obviously blurry or problematic images
- Organize photos by capture sequence if relevant
- Use a progressive workflow:
- Start with lower resolution for initial alignment and testing
- Gradually increase quality settings as you confirm good results
- Process in stages to identify and resolve issues early
- Optimize computer resources:
- Close unnecessary applications
- Use overnight processing for complex projects
- Consider cloud processing services for limited hardware
- Process subsets of large projects if needed
“Photogrammetry is a perfect example of ‘garbage in, garbage out,'” notes our reverse engineering specialist. “The quality of your source photos is far more important than having the most powerful computer or expensive software.”
Post-Processing: Refining Your Model
After initial processing:
- Clean and repair:
- Remove artifacts and floating geometry
- Fill small holes in the mesh
- Correct alignment issues if necessary
- Simplify mesh to appropriate polygon count
- Optimize textures:
- Balance resolution with file size
- Correct color and lighting inconsistencies
- Touch up areas with texture problems
- Create proper UV mapping if needed
- Export appropriately:
- Select format based on intended use (OBJ, STL, FBX)
- Include textures and materials as needed
- Scale model to correct real-world dimensions
- Document process and settings for reproducibility
Free tools like Blender, MeshLab, and Meshmixer provide powerful post-processing capabilities that rival expensive commercial options.
Maximizing Quality While Minimizing Costs: Advanced Tips
Go beyond basic techniques with these cost-effective approaches to improve results.
DIY Photography Rigs Under $50
Create specialized equipment on a budget:
- Automated turntable: Convert an old record player or microwave turntable with Arduino control
- Multi-camera trigger system: Synchronize multiple budget cameras using smartphone apps
- Light tent: Create using PVC frame and white bedsheets
- Boom arm system: Construct from plumbing pipe and camera mount
- Backdrop stand: Build using simple wooden frame and colored paper
“Some of our best results come from custom rigs built for under $100,” explains our digital capture specialist. “These purpose-built setups often outperform generic equipment costing much more.”
Free and Open Source Software Combinations
Create powerful workflows by combining specialized tools:
- COLMAP + Meshlab + Blender: Professional-grade pipeline using entirely free software
- VisualSFM + CloudCompare: Excellent for architectural and environmental scanning
- Regard3D + Meshmixer: User-friendly combination for object digitization
According to a study by the IEEE Computer Society, open-source photogrammetry pipelines now achieve 85-95% of the quality of commercial alternatives for most applications when properly configured.
CPU vs. GPU Processing: Smart Hardware Investments
If you’re considering hardware upgrades:
- GPU impact: Modern photogrammetry software leverages GPU processing, with NVIDIA cards typically offering the best performance-to-price ratio
- RAM considerations: 16GB minimum, 32GB+ recommended for serious work
- Storage solutions: Fast SSD for processing, larger HDD for archiving
- Budget allocation: Prioritize GPU > RAM > CPU for photogrammetry-specific builds
“If your budget allows for only one hardware upgrade, invest in the best GPU you can afford,” recommends our technical director. “A $400 GPU upgrade often delivers greater performance improvement than a $1000 CPU upgrade for photogrammetry processing.”
Real-World Case Studies: Budget Success Stories
Case Study 1: Museum Artifact Documentation
A small historical museum needed to create digital models of their collection for online exhibits with minimal budget.
Challenge: Document 50+ historical artifacts with high visual quality, despite having no dedicated digitization budget.
Solution:
- Used volunteer’s Canon Rebel T7 DSLR ($400) with kit lens
- Built DIY turntable and lighting setup ($75)
- Captured with consistent protocol (50-75 images per artifact)
- Processed using Meshroom (free) and Blender (free)
- Created web-optimized models with decimation and texture compression
Result: Created museum-quality 3D models averaging 30MB each, suitable for web viewing. The entire project cost less than $500 in equipment, compared to quotes of $15,000+ from professional scanning services.
Case Study 2: Small Business Product Visualization
An e-commerce seller needed 3D models of their product line for online shopping experiences.
Challenge: Create web-ready 3D models of 120 products with consistent quality and limited resources.
Solution:
- Used smartphone camera (iPhone 12) with clip-on macro lens ($25)
- Constructed simple light box with LED strips ($60)
- Developed systematic capture procedure (40 images per product)
- Batch processed using RealityCapture pay-per-model license ($300 total)
- Created simplified models optimized for web display
Result: Implemented interactive 3D viewers on their website, resulting in 28% longer average visit duration and 15% higher conversion rate. The entire project cost approximately $400, compared to the $6,000 quote they received for professional product photography.
Case Study 3: Architectural Documentation
A preservation committee needed to document historic buildings at risk of demolition.
Challenge: Create accurate 3D models of five historic structures with no specialized equipment.
Solution:
- Used committee members’ various cameras (no additional cost)
- Developed capture protocol with reference measurements
- Took 300-500 photos per building following systematic coverage plan
- Processed using WebODM (free) for initial alignment
- Refined models in Blender (free) with texture baking
Result: Created comprehensive documentation including accurate measurements and visual records. The models proved instrumental in securing preservation grants by demonstrating the buildings’ historical significance. Total cost was approximately $200 for measuring tools and storage devices.
Troubleshooting Common Issues on a Budget
Even with careful planning, challenges can arise. Here are cost-effective solutions to common problems.
Poor Alignment and Camera Position Estimation
If your software struggles to align photos correctly:
- Add more overlap: Take additional photos between existing ones
- Incorporate visual markers: Add temporary, high-contrast markers to the scene
- Use manual tie points: Identify the same points in multiple images manually
- Try different software: Different algorithms may perform better with your specific imagery
“When alignment fails, try processing a smaller subset of images first, then gradually add more,” suggests our technical lead. “This helps identify problematic photos without wasting processing time.”
Incomplete or Holey Models
For models with missing areas:
- Target specific angles: Add additional photos focusing directly on problem areas
- Improve lighting: Adjust illumination to better reveal detailed features
- Use mesh healing tools: Apply free software like Meshmixer to fill small gaps
- Consider multiple passes: Merge several scanning sessions with different lighting setups
The National Research Council of Canada recommends capturing at least twice as many images as you think necessary, especially for complex geometries—extra photos are free insurance against gaps.
Texture and Color Problems
For issues with visual quality:
- Control lighting environment: Use diffused, even lighting to prevent shadows and highlights
- Use gray cards: Incorporate color reference cards in several photos
- Apply texture blending: Use texture painting tools to correct inconsistencies
- Consider separate texture capture: Photograph textures directly and apply via UV mapping
“Perfect geometry with poor texturing still looks unconvincing,” notes our visualization specialist. “Often, improving lighting is completely free and delivers the most significant quality improvement.”
Scaling Up: Growing Your Capabilities Over Time
As your skills and requirements evolve, consider this strategic upgrade path.
Progressive Equipment Upgrades
Invest in improvements that deliver the greatest impact first:
- Lighting: Professional diffused lighting ($100-200)
- Lenses: Prime lenses with minimal distortion ($150-300)
- Camera body: Full-frame sensor for improved detail ($1,000-1,500)
- Automated rig: Programmable turntable and camera positioning ($300-800)
- Software: Commercial solutions with advanced features ($200-500)
“We recommend clients upgrade their process and technique before their equipment,” advises RDS. “Mastering fundamentals with basic gear yields better results than using advanced equipment poorly.”
Expanding Your Photogrammetry Applications
As your capabilities grow, explore new possibilities:
- 3D printing from your scans for physical reproduction
- Virtual reality experiences featuring photogrammetry environments
- Web-based 3D for online portfolios or e-commerce
- Mixed reality applications combining physical and digital elements
- Digital conservation of items that may deteriorate over time
Our 3D printing team has found that photogrammetry provides exceptional source models for creating physical reproductions, particularly for organic shapes and textured objects.
Conclusion: Achieving Professional Results on an Amateur Budget
Photogrammetry represents one of the most accessible entry points to professional-quality 3D modeling, offering results that rival systems costing 20-50 times more when proper technique is applied. By focusing on methodical process, environmental control, and systematic capture, you can create impressive 3D models with equipment you likely already own.
Key takeaways for budget-conscious creators:
- Process trumps equipment: Proper technique with basic gear beats poor technique with expensive systems
- Lighting matters most: Controlled, diffuse illumination dramatically improves results
- Quantity + quality: Sufficient high-quality photos are the foundation of successful projects
- Progressive improvement: Start simple and reinvest in capabilities as your skills grow
Whether you’re documenting artifacts, creating product visualizations, preserving architectural heritage, or bringing creative visions to life, photogrammetry offers a cost-effective pathway to professional 3D content creation.
Ready to start your photogrammetry journey? RDS offers workshops, consultations, and services to help you achieve optimal results regardless of your budget constraints. Our team can guide you from initial setup through advanced applications.
What objects or spaces are you most interested in capturing through photogrammetry? Share your project ideas or questions in the comments below, or contact us directly to discuss your specific 3D modeling needs.
